Learn how to protect sensitive emails from unauthorized access using S/MIME encryption, Confidential mode, third-party plugins, and other best practices.
Gmail offers TLS encryption for email transit, but additional security measures are advisable.
How to send encrypted email in gmail: use client-side encryption (CSE) for external recipients, S/MIME for trusted partners, TLS for transit only, and layer DLP to block sensitive data before send.
S/MIME is a security protocol that encrypts emails using public key cryptography. It's the most secure option but requires both the sender and receiver to support it.
Confidential Mode is a Gmail feature that restricts the forwarding, copying, printing, or downloading of emails and their attachments.
Third-party plugins like Flowcrypt, SendSafely, and Mailvelope provide additional encryption options for Gmail users.
Strac’s Gmail DLP promptly detects and redacts sensitive content in emails. It also provides a variety of data protection measures, such as encryption, alerts, blocking, quarantining, logging, and forwarding.
Gmail is one of the most widely used email platforms in the world, with over 1.5 billion active users sending emails through Gmail every month. Businesses, healthcare providers, and financial teams rely on Gmail daily to share sensitive information.
That’s why understanding how to send encrypted emails in Gmail is critical. Encrypting emails in Gmail helps protect sensitive data, prevents unauthorized access, and ensures confidential messages stay secure when sent through Gmail.
Updated May 2026 — how to send encrypted email in Gmail. Gmail supports confidential mode (link-based, with optional SMS passcode), S/MIME encryption (paid Workspace tiers), and end-to-end Client-Side Encryption (Workspace Enterprise Plus). For most knowledge workers, confidential mode is the simplest option; for healthcare orgs needing HIPAA-grade controls, Strac Gmail DLP adds the data-layer protection. See Strac Gmail DLP →
🎥What is Email Encryption?
Email encryption is the process of transforming the content of an e-mail into a coded format that can only be read by the intended recipient. This is crucial for protecting sensitive information, such as personal data, financial details, and confidential communications, from unauthorized access.
Email encryption typically employs cryptographic techniques to ensure that even if an email is intercepted during transmission, its contents remain secure and unreadable to anyone without the appropriate decryption key.
Why Is Gmail Encrition Necessary?
Email encryption matters because it protects sensitive information from being accessed, stolen, or misused. As cyber threats get more advanced, encryption acts as a basic but critical layer of defense.
For businesses, it’s often not optional. Regulations like HIPAA and PCI DSS require you to protect customer and financial data; not doing so can lead to fines and serious reputational damage.
Encryption also ensures that emails aren’t altered in transit, so what’s sent is exactly what’s received; this is especially important for legal and financial communication.
Finally, it helps verify who the sender actually is, reducing the risk of phishing and email fraud.
By implementing email encryption, organizations can enhance their data security posture and demonstrate a commitment to protecting their clients’ and employees’ privacy.
Types of Email Encryption
There are two main types of email encryption protocols:
S/MIME (Secure/Multipurpose Internet Mail Extensions): This protocol uses a centralized authority to manage encryption keys and certificates. S/MIME is widely supported by major email clients like Gmail and Outlook, making it a popular choice for both personal and business use. It allows for both encryption and digital signing of emails.
PGP (Pretty Good Privacy): PGP operates on a decentralized trust model, where users generate their own key pairs (public and private keys). This method provides more flexibility and control over encryption but requires additional setup through third-party tools. PGP is often used for personal communications and is compatible with various email clients.
What is an email encryption solution, and why do you need one?
An email encryption solution is a software or service that automatically encrypts outgoing emails and decrypts incoming encrypted messages. These solutions typically use advanced encryption algorithms to scramble the content of emails, making them unreadable to anyone who doesn’t have the decryption key.
Organizations need email encryption solutions for several reasons:
Comprehensive Protection: While some email providers offer basic encryption, dedicated solutions provide end-to-end encryption, ensuring that emails remain protected throughout their entire journey.
Ease of Use: Advanced encryption solutions integrate seamlessly with existing email clients, making it easy for employees to send encrypted emails without disrupting their workflow.
Compliance: Many industries require the use of specific encryption standards. Email encryption solutions help organizations meet these regulatory requirements effortlessly.
Centralized Management: IT administrators can set and enforce encryption policies across the organization, ensuring consistent security practices.
Advanced Features: Many solutions offer additional security features like message expiration, recall capabilities, and detailed audit logs.
By implementing a robust email encryption solution, organizations can greatly reduce the risk of data breaches & ensure the confidentiality of their communications.
Need to share sensitive files without email exposure? Try Strac Secure Share! End-to-end encrypted file sharing with passcodes, expiration controls, and full audit trails.
How to Open Encrypted Email
Opening an encrypted email typically involves a few steps, which may vary depending on the encryption method used:
S/MIME or PGP Encryption:
If you have the necessary decryption key installed on your device, the email should open automatically in your email client.
If not, you may need to install the appropriate certificate or key.
Password-Protected Encryption:
Click on the encrypted email attachment or link.
Enter the password provided by the sender (often sent through a separate, secure channel).
The decrypted message will then be displayed.
Web-Based Encryption Services:
Tap on the link in the email notification.
You may need to create an account or verify your identity.
Once authenticated, you can view the decrypted message in your browser.
Two-Factor Authentication:
Some systems require an additional verification step.
You might receive a code via SMS or need to use an authenticator app.
Enter this code to access the encrypted message.
It’s important to note that the process of opening encrypted emails can be simplified with the use of integrated encryption solutions that work seamlessly with popular email clients.
✨How Does Gmail Protect Your Emails?
Gmail employs several security measures to protect emails:
TLS (Transport Layer Security): Gmail uses TLS to encrypt emails during transmission between servers. While this protects emails in transit, it does not secure them once they reach the recipient's inbox.
S/MIME Support: For Google Workspace users, Gmail supports S/MIME, allowing users to send encrypted emails if both sender and recipient have S/MIME enabled.
Confidential Mode: This feature allows senders to set expiration dates for emails, revoke access, and restrict forwarding or copying of messages. However, it does not provide true end-to-end encryption.
Encrypted Email in Gmail: Confidential Mode
Third-Party Plugins: Users can enhance their email security with third-party tools like Flowcrypt or Mailvelope, which provide additional encryption options.
How do you Send an Encrypted Email in Gmail?
Gmail uses TLS to encrypt emails in transit. This leaves emails vulnerable to unauthorized access on reaching the destination server, especially if they linger in the recipient's inbox. You can encrypt emails using S/MIME, Confidential Mode, and other third-party plugins to protect sensitive information. Learn how to use these options to secure your email communications.
S/MIME: Encrypt and digitally sign emails for enhanced security
S/MIME, or Secure/Multipurpose Internet Mail Extensions, is a security protocol that encrypts emails using public key cryptography. When sending an S/MIME encrypted email, the sender encrypts it using the recipient's public key, ensuring only the recipient with the corresponding private key can decrypt it.
You can also use S/MIME to digitally sign emails, verify your identity, and ensure the email has not been tampered with. To digitally sign an email, the sender uses their private key to create a digital signature and attach it to the email. When the recipient receives the email, they can use the sender's public key to verify the digital signature. This can help prevent phishing attacks and other forms of fraud.
S/MIME complies with security regulations, making it ideal for corporate use.
Cons:
Implementation may require IT support due to its complexity.
Both parties must support S/MIME to send and receive encrypted emails.
S/MIME does not encrypt the subject line or metadata of emails.
Server issues may expose encrypted emails.
Confidential mode: Prevent accidental sharing of sensitive information
Confidential mode in Gmail is a feature that restricts the forwarding, copying, printing, or downloading of emails and their attachments. Senders can set message expiration dates, revoke access at any time, and require an SMS verification code to allow message access.
This mode is available for personal Gmail and Google Workspace (formerly G Suite) accounts.
Confidential mode doesn't prevent recipients from taking screenshots or utilizing malicious software to copy or download the email content.
How to turn on confidential mode?
For Google Workspace (paid) accounts - Organization level:
Sign in to an administrator account.
In the Admin console, navigate to "Menu" > "Apps" > "Google Workspace" > "Gmail" > "User settings."
In User settings, scroll down to "Confidential mode."
Check or uncheck the "Enable confidential mode" box.
Save your changes.
For Personal Gmail accounts
Open Gmail on your computer.
Click "Compose" to create a new email.
In the bottom right corner of the email composition window, click "Turn on confidential mode."
Set an expiration date and choose whether to include a passcode.
If you opt for "No SMS passcode," Gmail app users can open the email directly, while non-Gmail users will receive an email containing the passcode.
If you choose "SMS passcode," recipients will receive a passcode via text message. Ensure you enter the recipient's phone number, not your own.
5. Click "Save."
Pros and cons of confidential mode
Confidential mode, while not an encryption method, adds an extra layer of security to your emails. Let’s look at its pros and cons:
Pros:
It is convenient for regulated industries to send secure emails.
Simplifies the process of sending secure emails to all Gmail users.
Cons:
Recipients can still take screenshots or photos of confidential emails.
Recipients can find ways to bypass the expiration date and passcode requirements.
You can’t use confidential mode while scheduling emails.
Enable Confidential Mode by clicking on the lock icon at the base of the compose window. Set expiration dates and access restrictions as needed.
Send the email. The recipient will receive a link or code (if SMS verification is enabled) to access the message.
To open a confidential email:
Check your inbox for the confidential email notification.
Follow the link supplied in the email or enter the verification code if required.
Read the message within the designated time frame before it expires.
✨How to Ensure you’re Sending an Encrypted Email?
Here's how you can verify email encryption:
Begin composing your email as usual.
Add the recipient to the "To" field.
Notice a small lock icon to the right of the recipient's name; it shows the level of encryption that your message's recipients support. If there are multiple users with various encryption levels, the icon will show the lowest encryption status.
Click the lock to adjust your S/MIME settings or gain insights into your recipient's encryption level.
Encrypt email in Gmail: How to check if email is encrypted?
How to Verify the Encryption of Received Emails?
Follow the steps below to check whether you’ve received an encrypted email:
Open the received email.
Select "View details" on Android and then "View security details." On iPhone, tap "View details."
You'll now see colored icons indicating the encryption level.
Green (S/MIME enhanced encryption): The highest level of encryption, only the recipient with the private key can decrypt.
Gray (TLS or standard encryption): Used when an email service doesn't support S/MIME.
Red (No encryption icon): The email is unencrypted.
Security Best Practices With or Without Email Encryption
Regardless of whether you use email encryption, implementing security best practices is essential:
Use Strong Passwords: Create complex passwords that combine letters, numbers, and symbols to enhance account security.
Enable Two-Factor Authentication (2FA): This adds an additional layer of security by requiring a second form of identification when logging in.
Be Cautious with Links and Attachments: Refrain from clicking on fishy links or opening attachments from unknown sources to prevent malware infections.
Scan Attachments: Use antivirus software to scan all attachments before opening them, even if they are from trusted sources.
Avoid Public Wi-Fi for Sensitive Communications: Public networks can be insecure; use a VPN or avoid accessing sensitive accounts on these networks altogether.
By following these guidelines and utilizing available encryption methods, you can significantly enhance your email security and protect your sensitive information from potential threats.
Why Use Strac for Email Encryption?
Strac’s Data Protection tools provide comprehensive control over email security, enabling you to:
✅ Automatically encrypt emails without leaving your email app. ✅ Intercept, block, or quarantine emails containing sensitive data in the body, subject, or attachments. ✅ Scan email attachments to detect and flag sensitive data before they’re sent. ✅ Remove sensitive attachments to prevent unauthorized sharing, even if the email itself is secure. ✅ Encrypt attachments to ensure they remain protected. ✅ Revoke email access at any time to maintain security. ✅ Block email forwarding to prevent unintended data exposure. ✅ Keep confidential emails private with seamless security controls.
With Strac, you can proactively protect sensitive email communication while ensuring compliance with HIPAA, PCI, SOC 2, and more. 🚀
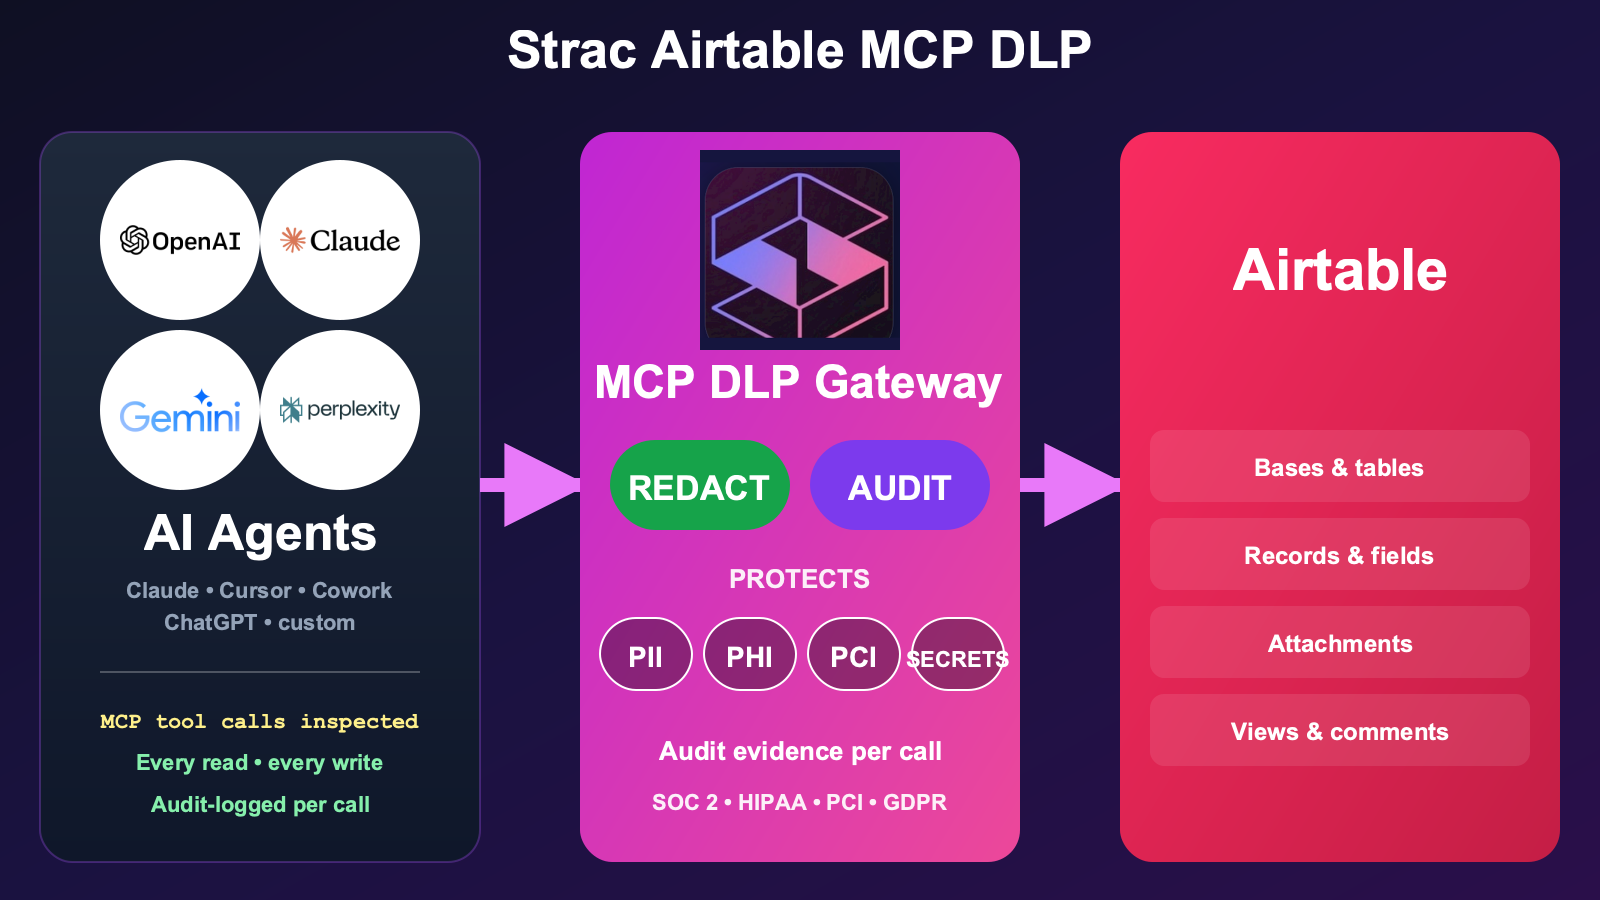
✨How to Prevent Sensitive Gmail Data from Leaking into ChatGPT and AI Tools
Email encryption protects messages in transit, but it does not stop employees from copying email content or uploading attachments into tools like ChatGPT, Gemini, Claude, or Copilot.
This is becoming one of the biggest data security risks for modern organizations. Teams often download invoices, contracts, payroll files, support tickets, source code, or customer records from Gmail and paste them directly into AI tools to summarize or analyze them.
The problem is that S/MIME, TLS, and Confidential Mode do not prevent this type of exposure. Once a user can access the email, the data can still leave the organization through AI prompts, browser uploads, screenshots, or copied text.
👉 Read our blog on AI DLP to learn how AI DLP prevents sensitive data exposure in ChatGPT, Claude, Copilot, Gemini, and other AI applications.
That’s why many companies now combine Gmail encryption with Browser DLP and GenAI DLP controls. This helps security teams:
Detect sensitive data before it is uploaded into AI tools
Block or redact PII, PCI, PHI, secrets, and source code
Prevent accidental leaks into ChatGPT, Gemini, and Copilot
Monitor AI-related data exposure across browsers and SaaS apps
For organizations handling regulated or sensitive data, encryption alone is no longer enough. You also need visibility into where that data moves after the email is opened.
✨Alternative Options to Secure Gmail Emails
Besides Gmail’s native security features, third-party plugins can enhance your email security further.
Option 1: Strac
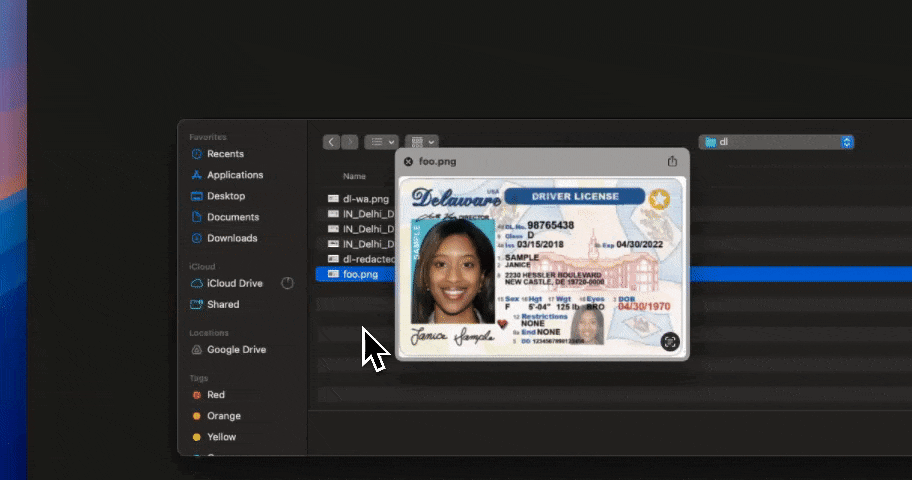
Strac does encryption and also offer other remediation actions like Blocking, Quarantining, Redaction and Encryption.
How to Send Encrypted Email in Gmail: Strac Redactor
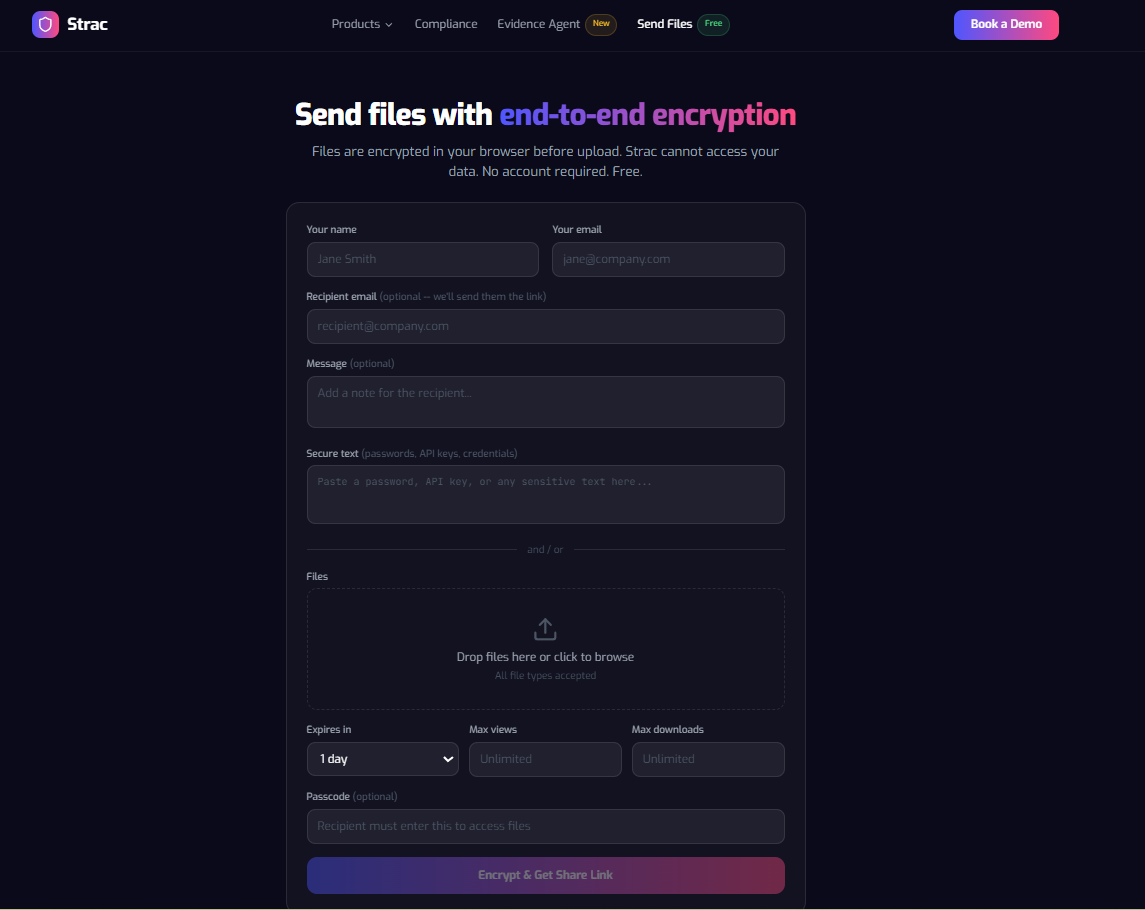
For files that are too sensitive for email, Strac also offers Secure Share — a safer way to send documents without attachments.
✅ End-to-end encrypted before upload ✅ Passcodes, expiration dates, and download limits ✅ Full audit trail of file access ✅ Ideal for IDs, contracts, payroll, and customer files
Flowcrypt is a desktop extension available for Firefox and Chrome. It seamlessly integrates with Gmail and introduces a "Secure Compose" button to your interface. Flowcrypt secures your messages using industry-standard Pretty Good Privacy (PGP) encryption. Here's how to use Flowcrypt:
Install the Flowcrypt extension for your preferred browser.
Click the "Secure Compose" button.
Enter a message password in the input field at the bottom of the “Secure Compose” window.
Click “Encrypt and Send” to send your email.
Option 3: SendSafely
SendSafely is an end-to-end encryption platform that ensures only you and your intended recipients can access shared information. It eliminates the need for pre-shared encryption keys or passwords. Here are the steps to send encrypted emails using SendSafely:
Install SendSafely Extension from the Chrome Web Store.
Authenticate and obtain the API Key and API User ID.
Enable "Google Mail Integration" in SendSafely settings.
Encrypt Attachments - Use the SendSafely icon in Gmail to encrypt attachments.
Encrypt Entire Message - Choose this for complete email encryption.
Option 4: Mailvelope
Mailvelope is a Chrome extension offering PGP encryption for Gmail. It provides robust end-to-end encryption. However, it may require some technical knowledge to set up.
Here's how to use Mailvelope:
Install Mailvelope Extension from the Chrome Web Store.
Open the Mailvelope editor by clicking the Mailvelope icon next to the compose button.
Enter the recipient's email address in the Mailvelope Editor.
Mailvelope will attempt to find the recipient's key. Green indicates success, red means no key found.
Compose your email, add attachments, and click "Submit" to send securely.
What secure sharing tools can you use to encrypt your email in Gmail?
While Gmail provides basic encryption for emails in transit, users often require additional security measures. Here are some secure sharing tools that can be used to encrypt emails in Gmail:
Virtru: This plugin integrates directly with Gmail, offering end-to-end encryption, access controls, and the ability to revoke sent messages.
Mailvelope: An open-source browser extension that brings OpenPGP encryption to webmail services like Gmail.
FlowCrypt: Another browser extension that adds a “Secure Compose” button to Gmail, allowing users to send PGP-encrypted emails easily.
ProtonMail: While not a direct Gmail tool, users can create a ProtonMail account and forward their Gmail messages to this end-to-end encrypted service.
Sendinc: This service integrates with Gmail to provide easy-to-use email encryption without requiring recipients to create an account.
Sometimes, the safest way to send encrypted email in Gmail is not to send sensitive files as attachments at all. Strac Secure Share gives teams a safer option for sharing confidential documents outside of inboxes and SaaS apps.
Files are encrypted in the browser before upload
Passcode protection, expiration dates, and access limits
View and download controls
Full audit trail showing who accessed files and when
Ideal for IDs, contracts, payroll files, customer records, and me
When choosing a secure sharing tool, it’s essential to consider factors such as ease of use, compatibility with recipients’ systems, and the level of encryption provided. Organizations should also ensure that their chosen solution complies with relevant data protection regulations and integrates well with their existing data discovery and classification processes.
For businesses using AI-powered tools like ChatGPT, it’s crucial to implement DLP solutions that can protect sensitive information across various communication channels, including encrypted emails.
✨Introducing Strac: Real-time Gmail Data Loss Prevention (DLP)
Strac’s Gmail DLP solution uses advanced algorithms to promptly detect and redact sensitive content in emails, protecting you from accidental data exposure.
When sending an email with sensitive content (in the body or attachment), you can choose from a variety of data protection measures, including:
Redact sensitive content
Encrypt the email
Receive an alert when sensitive content is detected
Why Encrypted Gmail Attachments Still Create Compliance Risk
Encrypting an email does not eliminate the risk of sensitive data exposure.
Once an email is opened, attachments can still be downloaded, copied, forwarded, uploaded into SaaS apps, or shared through collaboration tools like Slack, Google Drive, Jira,Zendesk, or ChatGPT.
This creates a major compliance challenge for organizations handling PII, PHI, PCI, financial records, or confidential customer data.
For example:
A payroll spreadsheet sent securely through Gmail can later be uploaded into ChatGPT
A support attachment containing PHI can be forwarded into Slack
A contract downloaded from Gmail can remain exposed in personal cloud storage
Encryption protects the email during delivery. It does not control what happens after access is granted.
That’s why modern security teams combine email encryption with SaaS DLP, Data Lineage DLP, and real-time remediation controls to continuously monitor where sensitive data moves across cloud apps, endpoints, and AI tools.
This approach helps organizations:
Detect sensitive files across SaaS and cloud environments
Revoke public sharing access
Redact sensitive information automatically
Track how files move between systems
Reduce long-term compliance and insider risk
Bottom line
If you need to send encrypted email in gmail consistently and pass audits, use a simple model: CSE for external recipients, S/MIME for trusted partners, TLS for routine mail, and treat Confidential Mode as access control, not encryption. Build rules that nudge or require users to send encrypted email in gmail when sensitive data appears, and pair that with Strac Gmail DLP to detect and redact PII, PHI, PCI, secrets, and source code before anyone clicks Send. Outcome: fewer incidents, cleaner audits, and a repeatable way to send encrypted email in gmail without slowing work.
🌶️Spicy FAQs on Sending Encrypted Email in Gmail
1) What is the fastest way to send encrypted email in gmail to external recipients?
Use client-side encryption (CSE). In compose, tap the lock/shield icon and choose additional encryption, then send. It keeps message body and attachments encrypted, and non-Gmail recipients can view through a secure flow. Add a short policy so users know when to toggle it.
2) Does Confidential Mode actually encrypt my message?
No. Confidential Mode limits forwarding, copy, print, and download, and can add passcodes, but it does not provide end-to-end encryption. For regulated content, send encrypted email in gmail with CSE or S/MIME.
3) How can I force employees to send encrypted email in gmail when sensitive data is detected?
Combine two controls:
Admin rules that require CSE or S/MIME for specified partners or subjects.
Strac Gmail DLP to detect card numbers, IDs, health data, secrets, and code in the body and attachments, then auto-redact, block, quarantine, or alert before send.
4) S/MIME vs CSE: which should I choose to send encrypted email in gmail?
CSE: easiest for broad external coverage and mixed ecosystems.
S/MIME: great for certificate-managed partners who already exchange keys and want signing plus encryption. Most orgs run both and route by data type or partner domain.
5) How do I know my Gmail message is encrypted before I hit Send?
CSE: the compose window indicates additional encryption is on.
S/MIME: look for the green lock next to recipients.
TLS: transit encryption is automatic, but not end-to-end. Train users to verify the lock state each time they send encrypted email in gmail.
6) Can I send encrypted attachments in gmail, or only the message body?
Both. With CSE or S/MIME, attachments are encrypted along with the message. For high-risk files, pair with Strac to auto-redact sensitive fields inside PDFs, images, and spreadsheets before encryption.
7) What should my Gmail encryption policy include to improve compliance?
When to send encrypted email in gmail with CSE vs S/MIME.
Required encryption for partner domains and data classes.
DLP actions on detection: redact, block, quarantine, notify.
Verification steps for users in compose.
Logging and evidence collection for audits.
Discover & Protect Data on SaaS, Cloud, Generative AI
Strac provides end-to-end data loss prevention for all SaaS and Cloud apps. Integrate in under 10 minutes and experience the benefits of live DLP scanning, live redaction, and a fortified SaaS environment.


.webp)


.webp)
.webp)


.gif)


.webp)